

The last time I spoke about decluttering and organizing, I shared what inspired the process and said "your decluttering success story can be a story of coming home. Coming home to yourself, to your creativity, and to what makes you happiest."
What I haven't shared until now is exactly how I did it; how I transformed a mess of old notes and drafts, scattered this way and that, into an inspiring, organized system that sparks creativity.
One of my favourite parts about organizing my work-in-progress this way is that it's much easier to return to it after a break (short or long), reignite my love for the project, and dive right back in. It took time to set things up this way, but it'll save me so much time and aggravation in the long run, and it'll help me write and create in a way that feels like fun while supporting dedicated writing sessions.
Step 1 | Lay the foundation for organization
The steps that laid the foundation of the entire process were to:
- Clarify what problems I currently faced with the writing process of my work-in-progress, and
- Decide what goals needed to be achieved to solve these problems
For one thing, I had too many different documents dancing about in rough draft dress. Writing was never as simple as opening one and carrying on from where I'd left off, especially because I'm not a "write every day" writer. Instead, it was an exercise in frustration as I wasted time figuring out which one was the right one, lest I end up carrying on with a scene that's long since been deemed irrelevant.
I needed to know which draft was my working draft, no ifs, ands, or buts.
Speaking of frustration, I had notes everywhere, with no rhyme or reason to them. I loved the idea of keeping them in a bullet journal or perhaps a binder, but I iterate on ideas too much and too often for that to work, so any pen-and-paper system didn't last long.
I needed all my notes together in one spot and I needed a system that could withstand numerous iterations. Electronic was the way to go.
This love of brainstorming and iteration also meant that I had layers upon layers of different plot and character possibilities, and while some were obviously obsolete, I was unclear on the status of others: was this what I'd decided to go with, or was this what had me so excited?
As much as possible, I needed to pare down to the most recent edition of plot and character developments.
Everything added up to a need for more space (physically, electronically, and mentally) to move forward creatively, to be able to brainstorm without panicking about it adding to the chaos, and to have a system that was flexible but easy to navigate.
Step 2 | Decide what would and wouldn't be digital
From assessing the issues with my current system (or lack thereof), I knew that the majority of my system going forward had to be electronic, and that it would be split between Microsoft Word, Pinterest, YouTube, and Spotify. Having an electronic system meant I could easily move things around, add to or otherwise modify them, or delete them without a trace.
The only things done by hand would be brainstorming or drafting when there was no computer access or I was craving pen and paper, and I'd transcribe these notes to the appropriate electronic home as soon as possible; and quick reference notes in a bullet journal.
While I still believe an analog bullet journal system is amazing for some writers, I think my personal preference going forward will be to have a few lists in my normal bullet journal for things that would be helpful to remember if I was writing while away from my computer, like the protagonist's goals and the main themes and motifs. Sorting this out hasn't been a priority just yet, so I don't know how much I'll use this part of my bullet journal, but the concept still feels like it has value on an ongoing basis.
Think you might prefer a pen-and-paper system? Visit this bullet journalling post to see how to set one up for your writing!
Step 3 | Make a list of must-haves for this draft
For any long-term project, I like to have a few things in place to make the process more immersive and sustainable. I can create in a more "barebones" fashion if I have to, but I don't enjoy it as much, and joy is a big part of my creative process.
With that in mind, I created a list of what I personally needed to have to be able to work on this current draft of my work-in-progress in the long run, and how to organize it/where to keep it. That list included:
A Soundtrack
This grows and changes over time, but having at least a few songs that put me in mind of my story and characters is a massive boon for my fiction writing. I used to create YouTube playlists for this but mostly use Spotify now.
Ambient Noise
A few years ago, when I first discovered the calming powers of ASMR (one of my favourite ways to destress), I also discovered ambient noise videos. I'd long been a convert to the idea of having "rainy noise" in the background of my writing sessions, so this wasn't a completely new concept, but the videos I've fallen in love with more recently layer different sounds to simulate the atmosphere of a real or fictional environment.
While it's not specific to my work-in-progress, I created a private YouTube playlist for ambience videos as I come across new favourites.
Delightful Ambience Videos to Explore
Food Inspiration
Since cooking and baking are such a significant part of the story, culinary videos on YouTube are a fun way to get inspired, remember quirky details that could enhance scenes, and tap into the heart of the story. This is one of the lower priority items on my list of "must-haves", but having a playlist set up with a few videos is a quick and easy way to keep my Muse engaged.
A Cast of Characters
I've cast people (usually performers in the TV or film industry) to play my characters since I was a teenager, a habit I know many writers share. While having a specific person to visualize has helped me write before, more often than not it's the voice that's most beneficial: dialogue seems to flow much easier when I can imagine it spoken by real people. With that being the case, I could see starting to cast voice actors or other public personalities in the future.
Any visuals from my casting live on a Pinterest board, and any videos that help me to visualize someone's style of movement or recall their voice (maybe even from a specific role) belong to a YouTube playlist.
One, and Only One, Rough Draft Document
I'll address this in more detail below, but as far as the makings of this list, I knew that going forward with a heap of confused rough draft documents wasn't going to work. I needed to pare them down until I was left with one Microsoft Word document.
Mini-Universe Notes for Key Scenes
After my cinematic epiphanies at the new year, and in reading The 101 Habits of Highly Successful Screenwriters (Karl Iglesias), I started to wish I could channel my love of visual media into a prose writing process. Then I came across Ron Bass' approach to outlining in Chapter 6, which includes a process he calls "'blocking' scenes".
"Next, I do what I call 'blocking,' which is putting together everything I might want to have in Scene One. It could be anything--dialogue, setting, tone, or what the character is wearing."
Ron Bass, The 101 Habits of Highly Successful Screenwriters (Karl Iglesias)
Why couldn't I do that for writing a novel? Just because a reader would never see the film set in my head, it could still aid in my ability to translate my thoughts into prose.
Besides, it sounded like a heck of a lot of fun!
I decided that, for any significant scenes in my story and/or scenes I was hugely excited to write, I would turn them into their own little universe, as opposed to viewing them as part of a whole (that could be taken care of in revisions later). I even created my own wee template for each miniature universe:
- set
- wardrobe
- colour cast and lighting
- soundtrack and sound effects
- summary
Once I filled out the template, I could jump in and start filming – I mean writing – by transforming the summary, and all the other notes, into a scene, line by line. This is such a fun process and improves my writing like mad, so I'm super excited to incorporate this into my creative journey from now on!
As for where to keep these Mini-Universes, they went on to find a home in my rough draft document. Would you like to see an example?
MINI-UNIVERSE #3 – Lolly is Missing!
Set: Alice’s wee little hometown flat. The sun has gone down and it’s dark outside, well past suppertime. She’s fallen asleep, exhausted, on the couch. The door to the patio is open, a soft breeze wafting in, carrying the scent of tomatoes ripe for the picking. It’s dark inside, too, because she’s napped for hours and there are no lights on.
Wardrobe: Alice is wearing shorts and a short-sleeve T-shirt. Her hair is still vaguely in a ponytail, but it’s been dragged half-out by being smushed against the couch. A hoodie, one of Griffin’s, lays nearby.
Colour Cast and Lighting: Dark inside and out. Starts flicking lights on once she gets up.
Soundtrack and Sound Effects: Quiet. Suspiciously so. A flare of worry, waking up, in the background music when she realizes the door to the patio is open and what this means. The music stills as she goes around the apartment, looking for Lolly in all her favourite spots and finding nothing. Her normally exasperatingly vocal kitten is nowhere to be found.
Summary: Alice wakes up from the unintentionally lengthy nap, not even having meant to fall asleep. She can’t deny that she must have needed it but, looking at the time on her phone [... and so on!]
One Collection of Notes and Snippets
This was the most crucial part of the list. Having notes and snippets all over the place wasn't productive, wasn't joyful, and made a mess of everything. I desperately needed to get on top of the notes so that I could make good use of them in the future, and I knew from past experience that finding a way to keep them all in one place would be beneficial. For me, that meant a Microsoft Word document.
A List of Character Names
While I may still put this in a bullet journal as well, along with some other quick reference material, this is one of the things that I knew had to go in the collection of notes in Word. Anytime a new character came onto the scene, I could add their name to the list.
Character Wardrobes
When I wrote this list, I had come to the realization that, seeing as I was so inspired by visual mediums like film, TV, and video games, I could incorporate some of the elements I loved most into writing prose, even if much of it stayed in my mind's eye. A Pinterest board or two could serve as the "wardrobe department" for my characters.
Set Design
Just as I craved a wardrobe department for my stories, I loved the concept of set design, especially as I often struggle to physically depict where scenes take place. The more visual inspiration I could gather on Pinterest, the more fun I'd have with the locations in my stories, which will hopefully translate to more vivid descriptions on the page.
Most of the things on this list were more about having something specific set up, with just a few starter components, that could grow over time. It didn't need to be perfect or "complete" for me to carry on, and keeping that in mind was important. Without that certainty, I might have fallen into the trap of feeling like I needed to have every character cast or pictures of every possible setting before carrying on.
Also, if this process had taken place at the very beginning of crafting the story as opposed to a point after I'd completed several partial drafts, this list may have looked different and perhaps even leaner. I find all the visual inspiration incredibly fun and helpful, though, so we'll see what happens next time I start a project from scratch!
Step 4 | Sort out the rough draft situation
Part one of figuring out which document was the current version of the rough draft was to gather all of them together (I had some on my desktop computer, some on my laptop, and I downloaded the latest backup version, too, just to be safe).
From there, I pared down any duplicates.
Once I was left with discrete versions of the rough draft, I compared them all, using the "last modified" dates and my own knowledge of the story to figure out which draft was the current working draft, and made doubly sure.
Finally, I deleted every old version of the rough draft. Every one.
While I would have balked at doing something this drastic in the past, I knew this time around it was the right thing to do. My vision for the story changed so much that the old versions were just confusing me and wasting time.
After pressing the delete button (and later emptying the Recycling Bin of those drafts) I felt no regret, only excitement.
Because I felt such a craving to start from scratch with my rough draft, much of that rough draft material might also end up in the recycling bin, but it felt right, and useful, to keep it for now. I made sure the scenes were organized roughly into chapters, created a table of contents at the beginning (more on this in a bit!), and then moved on to incorporating my Mini-Universes.
As the Mini-Universes form the core of my new rough draft, I sectioned off the scenes I'd written in the past but still wanted to keep, then started adding the Mini-Universes I'd already started at the beginning. I then gave each of them a descriptive name and formatted them so they would show up in the table of contents.
Now, with each new Mini-Universe I add, I can follow the same steps, keep an eye on the growing list in the table of contents, and move these new universes-turned-scenes around as the chronology reveals itself.
Step 5 | Sort through saved writing snippets
As well as the rough draft documents (most of which had been deleted), I had a snippets file. Whenever I trimmed away a morsel of rough draft, I'd save it into the snippets file if I was particularly chuffed with it or wanted to rework it in the future.
Over time, this document became unwieldy, full of nonsensical bits and pieces - in different fonts, even - that went on for pages and pages and pages. I wasn't ready to get rid of them all, full stop, but I scoured it, only keeping snippets I was still completely in love with, and deleted the rest.
Step 6 | Gather all the notes for this WIP
With a creative project that lasts longer than a couple days, you end up with notes everywhere. Sticky notes, whatever page happens to be free in a notebook, the back of a grocery list, a text message to yourself, a plethora of different e-documents.
After the first part of my "organize EVERYTHING" adventure, where I gathered all of my creative notes together, I looked through the writing notes for anything related to this work-in-progress and poured them into one Word document (any non-electronic notes got transcribed into the document).
Next, I roughly categorized the massive gathering of notes before going through them. Having all of the notes related to my work-in-progress in one spot made it much easier to trim them down, for two reasons:
- It was easy to see notes that were duplicated or triplicated.
- Having everything together made it easier to see which notes were no longer relevant, likely because they'd already been incorporated or related to an old version of the story.
I went through these notes and cut them down to size until the only notes I was left with were ones that still needed to be acted upon, now or in the future, and/or were still highly relevant reference material.
Subplot ideas, scene possibilities, character notes ... anything no longer relevant to the story I now wanted to tell went in the recycling bin.
This was a nerve-wracking process, as these were some of the earliest ideas I came up with, but I knew anything that was no longer working needed to go. My vision for the story now filled me with so much excitement and anticipation, and I needed to have faith in that vision instead of holding onto vestiges of past versions.
Step 7 | Sort the remaining notes into categories
Now that I knew which notes were left, it was easier to visualize the finished set of categories. I ended up with the following:
Current To-Dos and Considerations
I'll have to be careful that this category doesn't become the equivalent of a catch-all kitchen junk drawer, but this is where I keep random to-dos that don't fit anywhere else (e.g. "start log of recipe/food mentions"); potential motifs and themes to incorporate in different ways; notes on creating a Mini-Universe; and a scene drafting exercise, with an example of how it works.
Unfortunately, I can't find the source to credit for the scene drafting exercise at the moment, but as soon as I track it down, I'll share that with you, too!
Character Notes
Each of my main characters has their own subsection within this category, so I have a space to put notes about their character arc, their relationships with other characters, brainstorming about different elements of their personality or history, and other handy bits.
There's also a subsection for the main supporting characters as a whole, though I could easily subdivide this in future if I need to.
Finally, there's a list of character names.
Food Stuff
This category is unique to my work-in-progress: my main character works in the culinary industry, so any notes I have for kitchen shenanigans to explore, baked goods or cooked dishes to incorporate, or other food tidbits live here.
Plot Notes
Because I got rid of so many notes and decided I wanted to start a rough draft entirely from scratch, in a more experimental way, there's nothing resembling a structured plot outline under this category yet. In the future, this is where it would live.
Instead, this category is full of plot and subplot ideas, some more substantial than others. Some of them I absolutely want to incorporate into the current draft, while others are more of the "this could work, let's see how it goes" or "this is intriguing, is there anything I can use from it?" variety.
At the moment, the only separation within this category is between plot notes I wrote in early 2020, when the vision for how I wanted to move forward with this work-in-progress crystallized, and notes written before that point (which are less likely to fit my vision but are still worth considering).
Setting Notes
Any set design ideas that haven't been found yet on Pinterest or that are best put in words go here. I could also see creating a list of different locations that pop up in my work-in-progress. If there are any special considerations to be kept in mind for certain settings (a house that has a fancy security system, for example), that would also be included.
Cooking Class Notes
This is another one that's unique to my work-in-progress, and a significant enough part of my story that I set it up with its own category. I can keep notes here about the syllabus, the significance of different topics covered, and intangible concepts that may get incorporated (e.g. different interpretations of "comfort cooking").
Research Notes
I'm a massive research nerd, so this is one of my favourite categories, with subsections like specific subject areas to research, who in my circle of friends has related expertise, and resources (books, articles, etc.) worth investigating.
There's also a spot to keep note of what feels necessary for the first draft versus what can be left until revision drafts. Some things may be important to figure out later but not in the rough draft stage, when I'm still finding my way with the story. The main things I'd research early on would be things that have the potential to significantly impact how the story plays out. Anything else can wait until I'm doing revisions, so I've started keeping these notes in separate lists to make sure I don't sail too far into the Sea of Enthralling Research before coming back to port.
Inspiring Reactions
I keep rough drafts and early-stage brainstorming very close to my heart. However, any positive feedback to what I do share along the way is kept here, so I can seek out a dollop of encouragement anytime I need it.
Revision Notes
Big or small, this is where I keep anything that I know needs to be addressed in future revisions, such as a name changed partway through, a subplot that got dropped, or something I've learned to be a stereotype. Once revision time rolls around, I've got a head start on what needs to be taken care of!
Agent and Marketing Notes
While I try to focus on the task at hand rather than leap ahead to potential publication plans, it's fun to indulge once in a while rather than snarl at any such premature thoughts like a literary Scrooge. Whenever I hear a pertinent bit of information about a literary agent that could be a good fit or have an intriguing idea about how I could promote this story, this is where the info goes.
Title Ideas and Sequel Notes
Just as with thoughts about promotion or marketing, it's awesome to have a spot to keep potential titles or anything that could play into a sequel. I'd rather keep the information here and possibly delete it later than (a) waste time weighing up whether it's really worth hanging onto or (b) be a strict goose and not bother to keep any of these ponderings.
Step 8 | Create a table of contents
This is the beginning of the table of contents for my notes document:
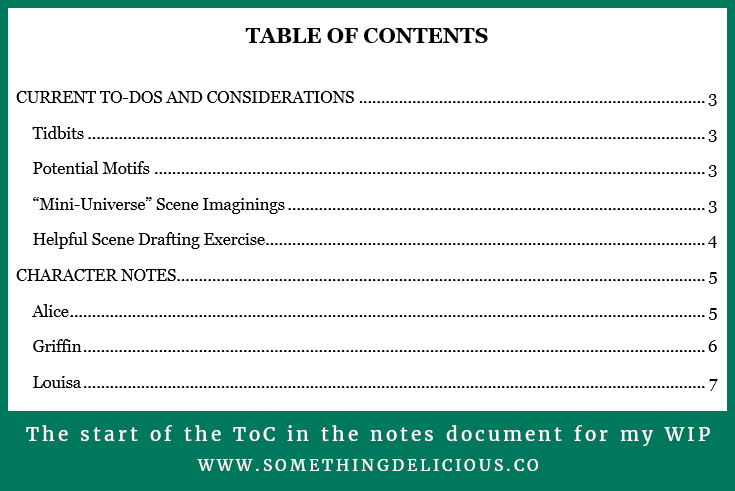
I'll expand on this in a future blog post, but learning how to effectively use Styles in Microsoft Word was life changing for this multi-passionate, "I want to investigate all the things" Gemini. For now, let's focus on what relates to my work-in-progress.
I used Styles for both the rough draft document and the notes document; specifically, I use the styles "Normal", "No Spacing", "Heading 1", and "Heading 2".
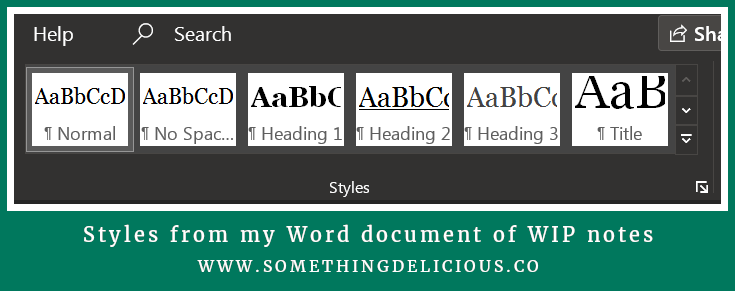
All the categories we talked about earlier are formatted through Styles, which automatically adds them to the table of contents at the beginning whenever I tell it to update.
This is the number 1 thing that enabled me to create a system that would adapt to my creative needs and fancies, because no matter how long the document gets, I can use either the table of contents (if I'm at the beginning of the document) or the Navigation Pane to zoom to whatever information I need to access.
New character note? Click ... zoom!
Another book to add to the research list? Click ... zoom!
Random marketing idea? Click ... zoom!
If you're excited to try this for yourself, I've published a step-by-step tutorial for Microsoft Word about how to format and organize your writing notes this way!
You can find that post right here.
And there it is! The story of how I tossed countless writing notes overboard and lived to tell the tale.
While this is mostly in order of how I went about it, it's not a perfect reproduction: there's some overlap, of course, and other bits I can't remember in fine detail, so feel free to use this as inspiration rather than an exact step-by-step guide. Adapt it however you please!
As for the final tally of this fine new system:
- 1 Microsoft Word document for the rough draft and Mini-Universe explorations
- 1 Microsoft Word document for notes
- 1 Microsoft Word document for snippets
- 2 Pinterest boards, one for set design and one for wardrobe
- 1 Spotify playlist for the soundtrack
- 2 YouTube playlists, one for ambience and one for food inspiration
We've covered masses of info in this post. If you'd like to save it for when you're ready to do some organizing yourself, pick your favourite of the images below and pin away!


Related Posts


